An ecomdash import/export format is a saved field map. It tells ecomdash which CSV column holds which product field when you bring inventory in, and how columns should be arranged when you export it. Build one by matching the format’s fields to your file’s column order, verify the match before saving, and then choose the right handling option at upload. The steps below cover each part, along with the menu paths you are likely to see and the points where a small setting changes the result.
What an import format and an export format each do
The two formats point in opposite directions. An import format explains how ecomdash should read a .csv file you upload. An export format controls how ecomdash writes a .csv file when you export. The current HostGator-hosted ecomdash help article on this feature puts it this way: “The Import Formats feature in Ecomdash is utilized to specify how .csv files are interpreted, while the Export Formats feature determines how the .csv file is written when it comes to exports.”
Because both are mappings rather than files, you build a format once and reuse it for every later upload or export that has the same layout. If your supplier or spreadsheet changes its column order, the saved format no longer matches and needs to be edited or replaced.
Before you start: check the file, not the screen
Open the CSV you plan to import, or the one you want an export to resemble, and write down the columns in order. Use the spreadsheet only to read or save the file. Nothing in the documented workflow requires special hardware or labels.
Quick wins for a faster PC:
Clear out junk files and repair common Windows errorsFree Scan →Scan for outdated or missing drivers - takes under a minuteDriver Scan →#1 Best Overall

- 【Unique Designed Screen Setting】It allows you to customize the screen display according to your preferences. With this innovative feature, you can easily set the language, adjust volume settings, select connection options, and view stored and total barcodes. Experience unparalleled convenience and flexibility as you personalize the settings of your Tera HW0009 to suit your specific needs. 【Package Includes: Barcode Scanner x1, Charging Cradle x1, Charging Cable x1, User Manual x1】
- 【Superior Global CMOS Imaging Scanning】This advanced scanner excels in fast and accurate reading of both ordinary and high-density barcodes, including challenging formats like PDF417 found on driver's licenses. Its exceptional performance effortlessly handles various scanning scenarios, including underwater scanning, reading barcodes on silver paper, reflective materials, and more.
- 【Charging Cradle & 2500mAh Large Battery】Designed with a convenient charging cradle, the HW0009 barcode scanner allows you to easily charge it whenever it's not in use. In addition, the scanner itself is equipped with a powerful 2500mAh battery, ensuring seamless all-day operation without the need for frequent charging.
- 【3-in-1 Connections & Widely Compatible】 Tera HW0009 wireless barcode scanner can work with bluetooth & 2.4G wireless & usb wired. The transmission distance can be 328ft in barrier free environment and 114ft in obstacles environment using 2.4G USB dongle. It can be connected with a variety of devices, such as smartphones, computers, POS, tablets. In addition, it is also compatible with various operating systems, such as windows 11/10/8/7/xp, Mac OS, iOS, android, linux.
- 【1D 2D QR code Programmable】2D: QR code, Data Matrix, PDF417(including PDF417 on driver’s license), Aztec, Maxicode, Micro QR, Micro PDF417; 1D: UPC/EAN, Code 128/EAN128, GS1-128, ISBT-128, Standard 2 of 5, Matrix 2 of 5, Code 39, Code 32, Code 93, Code 11, Codabar, PLESSEY, MSI, GSI Databar, ITF-14, GS1.
- Confirm the header row. The field order you configure in ecomdash has to follow the column order in the file.
- Include the core inventory fields. An older ecomdash setup guide uses SKU, product name, and product quantity on hand as the minimum for its initial bulk-inventory example. That guide is undated in the material reviewed, and it is a worked example rather than a rule that every current template must follow. Check the field list your account shows you.
- Decide whether the file creates products, updates them, or both. This determines the handling option you will choose at upload (covered below).
- Decide the format type. The current help article describes both manual and integrated formats for importing and exporting. It does not, in the material reviewed, walk through how an integrated format is configured, so for integrated setups follow the prompts in your own account.
Building an import format, step by step
- Open the import/export format setup screen. The current help article places this under Settings → Bulk Import/Export. Older documentation uses a different path (see the table further down).
- Select the import format type that fits your file, manual or integrated, and choose to create a new format.
- Add fields in the same order as the CSV columns. For example, if SKU is the first column, add SKU as the first field, then product name, then product quantity on hand, and so on for every remaining column.
- Run the verification step. The current help article includes a Verify format Matches File step before saving. Do not skip it: a format that looks correct on screen can still be out of order by one column.
- Save the format and give it a name that identifies the supplier or file layout, so you can select it again without rebuilding it.
What a mismatch looks like
If the field order does not match the file, the most likely symptom is values landing in the wrong fields, such as quantities appearing where product names should be. Rebuild the mapping from the file’s header row, verify again, and then re-upload. Test with a short sample file before uploading a full catalog.
Uploading with the right processing option
When you upload, select the matching format. The current product help page describes three ways ecomdash can handle products that already exist in the account. The choice changes the outcome of the same file, so read it before confirming the upload.
Rank #2

- Larger battery enables longer continuous usage and twice the stand-by time. With the unique battery indicator light showing the remaining battery level, no more Low Battery Anxiety.
- The curved handle is extended and widened. With specially designed smooth and flat trigger for a better grip.
- The orange anti shock silicone protective cover can prevent scratches and friction even when dropped from up to 6.56 feet. IP54 technology protects the wireless barcode scanner from dust.
- Plug and play with the USB receiver or the USB cable, no driver installation needed. Easy and quick to set up. Wireless transmission distance reaches up to 328 ft. in barrier free environment.
- Supports almost all 1D Barcodes: Febraban Bank Code, Codabar, Code 11, Code93, MSI, Code 128, EAN-128, Code 39, EAN-8, EAN-13, UPC-A, ISBN, Industrial 25, Interleaved 25, Standard 25, Matrix. Reads damaged, fuzzy, reflective and smudged barcodes.
| Option for existing products | What it does | When it fits |
|---|---|---|
| Take no action | Existing records are left unchanged. | Use when the file mainly adds new products and you do not want current details touched. |
| Overwrite details | Existing product details are replaced with the values in the file. | Use when the file is the authoritative source for names and other product details. |
| Increase quantity | The uploaded quantity is added to the existing quantity. | Use only when the file lists received or additional stock, not a full count. Using it with a full count will inflate totals. |
The “increase quantity” warning is the one most worth checking. If a file that already reflects your current on-hand counts is uploaded with this option, the stock figures will be overstated. Export your current inventory first so you have a before-and-after reference.
Building an export format
Export formats decide how your data is written out. The current product help page says you can choose an export template and, where the interface offers the controls, adjust which storefronts, warehouses, and attributes are included and how they are organized. The sources reviewed do not describe the full list of available attributes, so compare your export columns with the template before you rely on the file for another system.
Rank #3

- 【3-in-1 Multifunction Inventory Barcode Scanner】- The wireless barcode scanner is a multi-functional mode inventory scanner, Including scan gun mode, collection function, and inventory mode. You can create 180 storage libraries and store 400,000 data. Our inventory barcode scanners are mainly used in warehouses, medical, cosmetics stores, supermarkets, banks, logistics, libraries, shops, etc
- 【Powerful Recognition】This bar code scanner can read one-dimensional barcodes and two-dimensional codes in all directions. Identify 1D: Codabar, Code 11, Code93, MSI, Code 128, EAN,UPC,Code 39, UPC-A, ISBN, Industrial 25, Standard25, Matrix;Recognize 2D: QR, DataMatrix, PDF417, Aztec, Micro PDF417. It can also read the QR code on the screen of other smart devices.
- 【2.4G Wireless Long-distance Transmission】- Our wireless barcode scanner is connected to the computer through a 2.4G wireless USB receiver, supports WINDOWS XP/7/8/10 system, and is compatible with office software such as WORD/EXCEL/Text; the inventory barcode scanner transmits distance when there is no obstacle outdoors It can reach 200M/696 feet, and it can reach 50M/164 feet when there are obstacles or indoors
- 【Data Storage】 With Internal 4MB flash, the device can store barcode data when away from the receiver and update the data when back to wireless transmission range. Support up to 100,000 barcodes storage when offline. And if you don’t need to transfer data to the pc, you can have it stored in the device and export it when you need to
- 【Plug and play for Easy Portability】- Insert the USB wireless receiver into the computer, turn on the inventory scanner and connect to the computer immediately, plug and play, no need to install drivers or software, Compatible with most POS systems except those requiring proprietary hardware integrations or direct app-level integration.
- Open the export format setup under the same bulk import/export area as your import formats.
- Choose the export template you want to base the format on.
- Select the storefronts and warehouses to include, if your account shows those options.
- Select the attributes to include and arrange them in the column order your receiving system expects.
- Save the format and run a test export of a small set of products to confirm the columns.
Menu paths differ between documents
The documentation reviewed uses different navigation labels, which likely reflects interface changes over time. Use whatever your account currently shows, and treat the paths below as a starting point for finding the right screen.
| Source | Format setup | Inventory upload |
|---|---|---|
| Older ecomdash setup guide | Administration → Inventory Import/Export Format | Inventory → Inventory Management → Upload Inventory |
| Current HostGator-hosted ecomdash help article | Settings → Bulk Import/Export | Products → Upload Inventory |
What the available guidance does not settle
The material reviewed is procedural. It establishes what the import and export formats do, the verification step, the three existing-product options, and the export scope controls. It does not publish measured performance figures, benchmark file sizes, or recommended templates for specific marketplaces. Which handling option and which field set is best depends on where your inventory numbers come from and whether the file is a full count or a partial update.
Rank #4
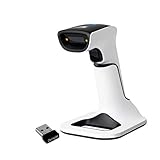
- Compatible with most POS systems except those requiring proprietary hardware integrations or direct app-level integration
- No Software Needed: No need to download or install any software or apps with this sleek handheld 3-in-1 wireless, Bluetooth, and USB scanner with vibration capabilities to help in noisy environments.
- Next Gen Smart Charging Stand: One base that can do it all. Wireless Transmission from stand to scanner. Holds scanner. Charges scanner's built-in rechargeable Li-Ion battery via lighting connectors
- Scan Modes: Connect to Mac or Windows computers, Android or Apple mobile devices, and POS systems to start scanning barcodes with one of the 3 available modes - manual, continuous, and auto sense
- Code Compatibility: Scan 1D barcodes including UPC, EAN, Code128, Code39, Code11, Codabar, and many others; Scan 2D barcodes including PDF417, Aztec code, Data Matrix, QR Code, Micro PDF, Interleaved, and others. Doesn't work with Maxicode
The older setup guide and the current help article are both vendor documents. Where they disagree on a menu label, the label in your own account is the one to follow.
Quick Recap
Quick reference
- Import formats read a CSV; export formats write one.
- Match field order to the file’s columns, then run the verify step before saving.
- Choose the existing-product option deliberately: no action, overwrite, or increase quantity.
- Test with a small file or a small export before running a full catalog.
Product prices and availability are accurate as of the date/time indicated and are subject to change. Any price and availability information displayed on Amazon at the time of purchase will apply.