Recommended Free Tools
To set up Apple Pay, add an eligible debit, credit, or prepaid card to the Wallet app, complete your card issuer’s verification, and make a test payment. You do not need Apple Cash or a separate Apple Pay app.
You need a compatible Apple device, current operating-system software, a participating card issuer, an Apple Account, and Face ID, Touch ID, Optic ID, or a device passcode. Availability varies by country, card network, and issuer; check Apple’s current country and region list.


Before you start
- Have the physical card or access to your issuer’s app. Manual setup may require the cardholder name, card number, expiration date, CVV, and billing details.
- Use a reliable internet connection and have access to the issuer’s verification channel, such as text, email, a phone call, or its app.
- Sign in to your Apple Account and keep its password or verification method available.
- Enable a device passcode or biometric authentication. Removing the passcode later removes payment cards from that device.
- Install the latest available version of iOS, iPadOS, watchOS, macOS, or visionOS.
Apple’s device-compatibility list covers model and country exceptions. In practical terms, supported categories include Face ID or Touch ID iPhones (except iPhone 5s), compatible iPads, Apple Watch Series 1 or later, supported Macs, and Apple Vision Pro. An iPad generally supports Apple Pay in apps and on websites rather than contactless retail payments.
Your card must be issued by a participating bank or credit union, and an otherwise participating bank may exclude particular cards. The issuer—not Apple—decides whether a card can be provisioned and whether a transaction is approved. Contact the number on the card if eligibility is unclear.
Free tools Windows power users keep installed
One-click scans. No signup required.
#1 Best Overall

- With Square Terminal, you can ring up sales, accept payments, and print receipts, all with one device. Use it at the counter or ring up customers anywhere in your store.
- Accept all major credit and debit cards and pay one low rate with no hidden fees and no long-term contracts.
- Process chip cards in just two seconds.
- Get your money as soon as the next business day.
- Use it cordlessly with the built-in battery, designed to last all day.
How to set up Apple Pay on iPhone in 10 steps
-
Check regional and card availability
Confirm that Apple Pay is available where you live and that your issuer supports your specific card. Apple Pay availability is separate from Apple Cash, which is a U.S.-focused feature and is not required.
-
Update the iPhone
Open Settings → General → Software Update and install the latest available iOS update. Apple’s required version changes as software changes, so use the current release rather than an old version number.
-
Turn on a passcode or biometrics
In Settings → Face ID & Passcode or Settings → Touch ID & Passcode, set up the requested authentication. Apple Pay requires a passcode or supported biometric method.
-
Sign in and check two-factor authentication
Make sure the iPhone is signed in to your Apple Account. If provisioning fails, verify that two-factor authentication is enabled; Apple lists it among the checks for card-addition problems.
Quick wins for a faster PC:
Repair Windows errors before they cause bigger problemsFix Now →Fix the driver behind crashes, sound loss and screen glitchesFind Drivers →Clear out junk files and repair common Windows errorsFree Scan →Special offer. See more information about Outbyte and uninstall instructions. Please review EULA and Privacy policy. -
Open Wallet and add a card
Open Wallet, tap the Add Card button, choose Debit or Credit Card, and tap Continue. Wallet may also show eligible cards under Cards Found For You.
-
Scan the card
Hold the card near the iPhone or position it in the on-screen frame if Wallet offers scanning. Scanning is optional; Apple says the camera does not save a card image to the device or photo library. See Apple’s card-entry security guidance.
-
Enter details manually when necessary
Tap Enter Card Details Manually if scanning fails, then supply the name, card number, expiration date, CVV, and any requested billing information.
-
Accept terms and verify with the issuer
Review the issuer’s terms and choose the offered verification method. It may be a text message, email, phone call, issuer app, or additional identity information. The bank controls this step.
Crashes, No Sound, or Screen Glitches?
Random freezes, missing sound and display glitches usually trace back to one bad driver. Find and replace yours safely.Free scan · under a minutePC Slower Than It Used to Be?
A free scan shows the junk files, broken settings and background clutter dragging Windows down - then fixes them in one click.Free scan · Windows 10 & 11Special offer. See more information about Outbyte and uninstall instructions. Please review EULA and Privacy policy.Rank #3
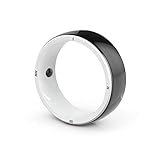 GDNSLife Smart Ring Build-in 6 RFID Cards & 128GB Wireless Disk Sharing & 2 Health Stones & Many NFC Functions for iPhone Android.Ceramic Ring for Men Women. (Black, L)
- 【Unique Design】The Smart Ring boasts a distinctive Tai Chi-inspired dual-color design on both its front and back, making it a stylish and trendy accessory.
- 【Wide Range of Applications】This versatile ring can simultaneously emulate 2 IC cards (13.56MHZ), 2 ID cards (125KHZ), and 2 NFC cards, covering a wide spectrum of uses such as access control, turnstile access, elevator cards, parking permits, timekeeping cards, supermarket loyalty cards, gas cards, medical IDs, and beyond.
- 【Effortless Sharing】Experience seamless sharing of your social account information across virtually all mainstream platforms with the R5 Ring. It simplifies the process of connecting with others on your phone.
- 【Personalized Features】The R5 Ring also enables you to instantly activate a multitude of personal functions at your fingertips, including location-based messaging, virtual calls, remote control of MI Home Smart Devices, and execution of Apple Shortcuts scripts.
- 【Wireless File Sharing】Enjoy exclusive access to 128GB of wireless storage space with the R5 Ring, allowing you to quickly share files with other devices on the move.
-
Wait until the card is ready
Wallet should show the card as an active payment card rather than asking you to finish verification. If the issuer declines provisioning, Apple cannot override that decision.
-
Make a small test payment
At a contactless terminal, double-click the side button on a Face ID iPhone or the Home button on a Touch ID iPhone, authenticate, and hold the top of the iPhone near the reader. Wait for Done and a checkmark. The merchant must accept Apple Pay, your card, and its payment network; a contactless symbol alone does not guarantee acceptance. Apple’s payment and merchant guidance is at Make purchases using Apple Pay and Learn where to use Apple Pay.
Set up Apple Pay on other Apple devices
Apple Watch
On the paired iPhone, open Apple Watch → My Watch → Wallet & Apple Pay → Add Card, choose Debit or Credit Card, and complete scanning or manual entry and issuer verification. The watch needs its own passcode, and the card is provisioned to the watch rather than merely mirrored from the iPhone. On supported watchOS versions, you can also use Wallet → More Options → Add Card on the watch. See Apple’s Apple Watch setup guide.
iPad
Go to Settings → Wallet & Apple Pay → Add Card. iPad Apple Pay is primarily for apps and websites, not ordinary tap-to-pay terminals.
Do these 3 things before closing this tab:
1Scan for outdated or missing drivers - takes under a minute2Clear out junk files and repair common Windows errors3Fix the driver behind crashes, sound loss and screen glitchesMac
On a Mac with Touch ID, use System Settings → Wallet & Apple Pay → Add Card. On a Mac without built-in Touch ID, an eligible iPhone or Apple Watch can authorize purchases. On the iPhone, enable Settings → Wallet & Apple Pay → Allow Payments on Mac.
Apple Vision Pro
Use Settings → Wallet & Apple Pay → Add Card and follow the verification flow. Apple Pay on Vision Pro is for supported apps and websites and remains subject to software, market, and issuer restrictions.
Make payments after setup
In a store with iPhone
Double-click the appropriate button, authenticate, and hold the device near the contactless reader until the checkmark appears. If the default card is not the one you want, tap the displayed card before authenticating and select another.
With Apple Watch
Double-click the watch’s side button and hold the display near the reader. The watch must be unlocked and have its passcode enabled.
Best Value

- NFC Wireless Charging Chip NFC Coil Flex Cable Replacement Compatible with Apple iPhone 14 Pro
- Tips: This is NFC Wireless Charging Chip NFC Coil Flex Cable replacement to replace your old damage one, don't include instructions, please install it by a professional technician.
- If your NFC Wireless Charging Chip NFC Coil cannot work well, don't need to change new machine, just buy this item and replace your damage one, let your Device work again.
- Compatible with: Apple iPhone 14 Pro (Please check your device model before made your purchase)
- This Product is fragile, easy to be damage during shipping. So if you have any questions, please contact the seller first, we will try our best to help you.
In an app or on a website
Tap the Apple Pay button, confirm or change the card, review shipping, billing, and contact details, then authenticate. Face ID generally uses a side-button double-click; Touch ID uses Touch ID or the passcode; a Mac without Touch ID uses a paired iPhone or Apple Watch. Look for Done and a checkmark.
Independent reader supportYour contribution helps us test, update, and keep practical guides available for everyone.Change the default card
The first payment card added to a device becomes its default. On iPhone, open Wallet, touch and hold the desired card, and drag it in front of the others. For Apple Watch, use Apple Watch app → My Watch → Wallet & Apple Pay → Default Card. You can select a different card for a single purchase without changing the default. Apple documents these controls in Change or remove payment cards.
If Apple Pay will not set up
| Message or symptom | What to check | Who can fix it |
|---|---|---|
| Could Not Add Card | Issuer participation, device compatibility, current software, passcode or biometrics, supported region, Apple Account two-factor authentication, internet access, and service status. | Contact the issuer after those checks. |
| Invalid Card | Eligibility, entered details, expiration or replacement status, card restrictions, and whether the issuer requires app-based verification. | The issuer decides eligibility and the next action. |
| Card Device Limit | A provisioning limit has been reached. | Ask the issuer to resolve the limit; repeated retries or deleting unrelated cards may not help. |
| Verification code never arrives | Check the phone number and email held by the bank, open its app, and look for a security alert. | Use the number on the card. Never give a code to an unsolicited caller. |
| Card added but payment declined | The transaction is being rejected by the card account, merchant, network, or issuer rules. | Contact the card issuer, which controls approval. |
Apple’s troubleshooting instructions are in If you can’t add a card to Apple Wallet. For a declined transaction, see If a payment card used with Apple Pay is declined. If you sign out of iCloud or remove the device passcode, Apple says cards are removed from that device and may need to be added again.
What Apple Pay protects—and what it does not
Apple says ordinary Apple Pay transactions do not send the merchant your original card number. The issuer creates a device-specific Device Account Number, stored in the device’s Secure Element, and transactions use dynamic security codes. Apple says it does not store the original credit, debit, or prepaid card numbers. Face ID, Touch ID, Optic ID, or a passcode normally authorizes payment, except for certain Express Mode uses. These are Apple’s documented design claims, not a guarantee against every type of fraud; your issuer’s fraud controls, merchant policies, and dispute process still apply. See Apple’s Apple Pay security and privacy overview.
If your iPhone or Apple Watch is lost or stolen
- Use Find My to place the device in Lost Mode; Apple says this suspends Apple Pay.
- Remotely erase the device if necessary; erasure removes the ability to pay with cards on it.
- Remove the device’s payment capability from your Apple Account device-management page.
- Contact the card issuer if you need an immediate card suspension or replacement.
Apple Pay is not Apple Cash or Apple Card
Apple Pay is the wallet and payment system for eligible cards. Apple Cash is a separate U.S.-focused feature for activities such as person-to-person transfers and is not needed for ordinary card setup. Apple Card is an optional U.S. credit product subject to application and approval; you do not need it to use Apple Pay. Apple explains adding Apple Card at How to add Apple Card to Apple devices.
There is usually no separate consumer setup fee for Apple Pay, but your card’s normal interest, foreign-transaction fees, account fees, and other terms still apply. Buying an iPhone or Apple Watch is optional if you already have a compatible device; official product pages are available for iPhone and Apple Watch.
Quick Recap
Product prices and availability are accurate as of the date/time indicated and are subject to change. Any price and availability information displayed on Amazon at the time of purchase will apply.